Codex Guide
macOS · 2026 edition
The complete guide
How to use
Codex on Mac.
From download to mastery of OpenAI's coding agent. Every setting, every command, every workflow.
Compiled for Developers & builders
Level Beginner → Mastery
Vol. 01
Codex Guide

Welcome.

Codex is OpenAI's coding agent. The Mac app is its most polished surface — a desktop application built for working on real codebases, in parallel, with full guardrails. This guide takes you from never having heard of it to operating it fluently.

You may already know GPT-5 from ChatGPT. Codex is what happens when OpenAI takes that model and gives it real hands — file system access, a terminal, a browser, a Git repo, a sandbox. It writes code. It edits files. It runs commands. It commits changes. It tells you what it did, lets you review, and waits for your approval where it matters.

The guide is written for someone who has used ChatGPT or Cursor but never installed a real agent on their own machine. Every term that might be new is explained on first use. Skip ahead any time using the section headers.

How this guide is structured

Part 1 — Foundations. What Codex is, the four surfaces, the vocabulary.
Part 2 — Install & sign in. Mac app download, auth, first launch.
Part 3 — First project. Opening a folder, the interface tour.
Part 4 — Daily use. Threads, slash commands, approvals, settings.
Part 5 — Power features. Worktrees, Computer Use, browser, MCP, automations.
Part 6 — Reference & mastery. AGENTS.md deep dive, memories, troubleshooting, cheat sheet.

Promise

Finish this guide and you will know how to install Codex on a fresh Mac, configure it for your workflow, write a great AGENTS.md, use worktrees to run tasks in parallel, and debug whatever goes wrong. No magic. Just the actual mechanics.

Page 02
Part 01 / 06
Foundations
What Codex is. The four surfaces it ships on. The vocabulary every later section assumes.
Codex Guide

What is Codex?

OpenAI's coding agent. Not an autocomplete plugin, not a chat window — an autonomous agent that reads, edits, and operates inside your codebase.

Most AI tools you have used in your editor are assistants — Copilot suggests, you accept or reject. Codex is an agent. You give it a task. It plans, opens files, makes changes across multiple files, runs commands in a terminal, executes tests, and comes back with a working diff. You review and approve.

Codex
From the official Codex assets · developers.openai.com

What it can do

Page 04
Codex Guide

Codex vs other AI tools

Why this is different from Copilot, Cursor, or just typing into ChatGPT.

Versus GitHub Copilot

Copilot is autocomplete-grade. You type, it suggests the next few lines. Helpful, fast, narrow. Codex operates at a higher altitude — give it a goal, it makes decisions across files, runs the result, returns a working diff. Copilot is a co-pilot; Codex is more like a junior engineer.

Versus Cursor / Windsurf

Cursor and Windsurf are editors with strong AI features bolted in. They live inside your editor window. Codex is its own application. It can also extend INTO those editors via the IDE extension, but the desktop app is where the heavy lifting happens — parallel threads, worktrees, computer use, the full feature set.

Versus typing into ChatGPT

ChatGPT can write code, but it can't read your repo, edit your files, run your tests, or commit changes. Codex does all of that. Same model family underneath. Different runtime.

Versus Claude Code / Hermes Agent

Direct competitors. Claude Code is Anthropic's equivalent CLI agent. Hermes is Nous Research's. Codex is OpenAI's. Same broad shape, different polish in different places. Codex's Mac app is the most polished GUI of the three.

Bottom line

If you write code daily and want one agent that handles end-to-end work — read, plan, edit, run, review — Codex is purpose-built for that. Pick it as your primary, layer Copilot or others if you want them too.

Page 05
Codex Guide

The four surfaces

Codex ships in four places. Same engine, different interfaces. Pick based on how you work.

SurfaceBest for
Desktop AppMost users. Daily driver. Polished UI, parallel threads, worktrees, in-app browser, image gen. macOS + Windows. Linux coming.
CLITerminal-first workflows, scripting, CI. Same engine, no GUI. Works over SSH. Best for headless servers.
IDE ExtensionWorking inside VS Code, Cursor, Windsurf. Lives in the sidebar. Useful when you already have the IDE open.
Cloud (chatgpt.com/codex)Mobile, browser-only setups, GitHub PR review. No install. Connect a GitHub repo. Tag @codex in PRs to delegate.

All four share the same auth

Sign into the Mac app once with your ChatGPT account, and the CLI and IDE extension recognise you without re-auth. The cloud surface uses the same identity. One key, four surfaces.

All four read the same skills

Skills you create in the Mac app are usable from the CLI and IDE extension. AGENTS.md files at the project root apply across all surfaces. Memories you build up persist across surfaces. The agent is one entity wherever you talk to it.

Page 06
Codex Guide

Why start with the Mac app

All four surfaces work. The Mac app is the recommended starting point. Here's why.

1. It's the most polished

Every Codex feature exists in the Mac app first. The CLI catches up over time, the IDE extension exposes a subset. If you want the full feature set out of the box, the desktop app is it.

2. Parallelism is native

The Mac app handles multiple threads in worktrees natively. You can have Codex working on three things at once — each in its own Git branch, each in its own isolated workspace. The CLI can do this too, but the UI for managing it is far better in the app.

3. Computer Use lives here

Only the Mac app can drive your cursor and keyboard. Useful for tasks that touch native macOS apps, drag-and-drop workflows, or services with no API. Not available in CLI or IDE extension.

4. The in-app browser

A built-in Chromium pane Codex can navigate. Read docs, fill forms, scrape data without leaving the app. Different from your Chrome — see the Chrome extension page for when to use which.

5. Visual diff review

When Codex proposes file changes, the Mac app shows them in a real diff viewer with accept / reject / edit controls. The CLI shows you a text diff and waits for y/n. Both work; one is dramatically easier on the eyes.

When to use the CLI instead

SSH'd into a remote server. Running Codex in CI. Scripting headless workflows. Anywhere you don't have a GUI available. The CLI is the right tool there.

Page 07
Codex Guide

Glossary

Every term that appears later. Read once, refer back any time.

TermMeaning
AgentA program that takes a goal, plans steps, uses tools, and acts without you holding its hand at every step.
ThreadOne conversation with Codex on one task. Has a goal, history, isolated workspace. Multiple threads run in parallel.
WorktreeAn isolated Git branch + working directory per thread. Lets Codex work on a feature without polluting your main branch.
AGENTS.mdA markdown file in your project root that tells Codex how to work in this codebase. Project brief.
Sandbox modeHow much Codex can do on your filesystem and network. Read-only / workspace-write / danger-full-access.
Approval modeWhen Codex asks permission. Untrusted / on-request / never.
MCPModel Context Protocol. An open standard for plugging external tools into AI agents. Codex speaks MCP.
SkillA reusable instruction set Codex can invoke across app / CLI / IDE. Like a saved macro.
Computer UseCodex driving your cursor, keyboard, and screen autonomously.
AppshotA one-shot screenshot of the frontmost macOS window sent into the thread.
Plan modeA toggle that makes Codex think step-by-step before acting. Better on complex tasks.
Goal modeA persistent objective Codex works toward until done. Multi-turn autonomy.
MemoriesPersistent facts about you and your workflow that survive across threads.
ChronicleLong-form session history. Codex reads it to maintain context across days.
SubagentA child agent Codex spawns for parallel sub-work.
Local modeCodex runs against your local filesystem. The default when you open a folder.
Cloud threadA thread that runs on OpenAI's infrastructure (not your machine). Needs ChatGPT auth.
Page 08
Part 02 / 06
Install & sign in
From download to first launch in under five minutes.
Codex Guide

Prerequisites

The shortest possible list. Most users already have everything they need.

macOS requirements

Account requirements

You need one of:

Which to pick

SituationPick this
You already use ChatGPT regularlyChatGPT account — your existing plan covers Codex
You only use Codex programmatically (CI, scripts)API key — pay per token, no subscription
You're on a team with shared billingBusiness or Enterprise — admin controls + shared usage
You want the absolute fastest pathChatGPT Plus ($20/mo) — covers everything
Note

You can switch between auth methods later from the Settings panel. The app stores credentials securely in macOS Keychain — no need to manage tokens manually.

Page 10
Codex Guide

Downloading the app

Two minutes. No terminal commands.

Step 1 — Get the .dmg

Go to developers.openai.com/codex/app and click the macOS download button. Pick Apple Silicon if you have an M-series Mac (most Macs from 2020 onward), Intel if older.

Not sure which you have? Apple menu → About This Mac. If "Chip" says Apple M1 / M2 / M3 / M4 / etc., you're on Apple Silicon. If it says Intel Core, you're on Intel.

Step 2 — Open the .dmg

Double-click the downloaded file. A Finder window appears with the Codex app icon and an Applications shortcut. Drag the Codex app into the Applications folder.

Step 3 — Eject the disk image

Right-click the mounted "Codex" disk image on your desktop and choose Eject. Optional but tidy.

Download size

The .dmg is around 180-220 MB depending on architecture. Installation grows the footprint to about 400 MB once unpacked. The data folder grows from there as you use it.

What's inside the app

Beyond the GUI shell, the Codex app bundles a CLI binary at /Applications/Codex.app/Contents/MacOS/codex-cli. The app's preferences panel can optionally symlink this to /usr/local/bin/codex so you can run the CLI from any terminal.

Page 11
Codex Guide

First launch

Gatekeeper, permissions, and the sign-in screen.

Opening Codex the first time

Open Codex from Applications or Spotlight. On first launch, macOS Gatekeeper asks you to confirm the unidentified developer. Click Open.

If macOS blocks the app entirely

If you see "Codex can't be opened because it is from an unidentified developer" with no Open button:

  1. Right-click the Codex app in Applications
  2. Choose Open from the context menu
  3. Click Open in the resulting confirmation dialog

You only have to do this once. Future launches work normally.

What you see next

The sign-in screen. The OpenAI logo, a "Continue with ChatGPT" button, and a smaller "Use API Key" link below.

Optional: pin Codex to the Dock

Right-click the Codex icon in the Dock while running, choose Options → Keep in Dock. Means you can launch it from the Dock without going through Spotlight every time.

Optional: enable system permissions early

Some Codex features need macOS permissions: Accessibility for Computer Use, Screen Recording for Appshots, Camera/Microphone for voice mode. You can grant these on-demand when first triggered, or pre-grant them now in System Settings → Privacy & Security.

Page 12
Codex Guide

Sign in with ChatGPT

The recommended path. Five clicks, no token management.

The flow

  1. Click Continue with ChatGPT on the sign-in screen
  2. Your default browser opens an OpenAI authorization page
  3. Log in if you aren't already
  4. Click Authorize to grant the Codex app access to your account
  5. The browser hands control back to the Codex app — you're signed in

What you get

If the browser doesn't redirect back

Sometimes the macOS handoff fails — the browser stays on the success page and Codex sits at the sign-in screen. Fix:

  1. Copy the URL the browser is showing (starts with codex://)
  2. Paste it into Spotlight
  3. Press Enter — macOS routes the URL to the Codex app

Verifying it worked

After successful sign-in, the project picker screen appears. You see a sidebar listing past projects (empty on first run) and a button to open a new folder. If you see this, you're ready.

Plan tier shows in Settings

Go to Codex → Settings → Account to confirm which plan you're authenticated under. The model picker will only show options your plan supports.

Page 13
Codex Guide

Sign in with an API key

For scripts, CI, or when you prefer pay-per-token.

The flow

  1. Go to platform.openai.com/api-keys
  2. Click Create new secret key, give it a name like "Codex Mac app"
  3. Copy the key (starts with sk-) — you won't see it again
  4. Back in Codex, click Use API Key on the sign-in screen
  5. Paste the key, click Continue

What you get

What you don't get

Securing the key

Codex stores your API key in macOS Keychain. The key is never written to a config file in plaintext. If your machine is shared, lock it when away — Keychain unlocks when you're logged in.

Rotating the key

Go to Settings → Account. Click Sign out. Sign in again with the new key. The old key is removed from Keychain automatically.

When to pick this path

You don't have a ChatGPT subscription, you're running Codex in CI, or you want to track Codex spend separately from any ChatGPT usage.

Page 14
Part 03 / 06
First project
Open a folder. Meet the interface. Send your first task.
Codex Guide

Opening your first project

Codex works on folders. Each folder is a project. Pick one.

Picking the folder

After sign-in, the project picker shows past projects (none yet) and a Open Folder button. Click it and navigate to any directory containing code.

Good first-project choices

Avoid your most critical production repo on day one. Get comfortable first.

What happens when you open a folder

  1. Codex indexes the project — file tree scan, README parsing, language detection
  2. It looks for an AGENTS.md file at the root — if present, loads it into context
  3. It detects whether the folder is a Git repository — if so, enables worktree-based isolation
  4. It surfaces the project in the sidebar and opens a fresh thread

First message — what to type

The fastest way to learn Codex's behaviour is to try one of these:

Tell me about this project. What does it do, how is it structured,
what would I improve first?
Find and fix bugs with minimal changes. Be conservative.
Show me a diff before applying anything.
Build a classic Snake game in this repo. Use whatever stack
makes sense given what's already here.
First response is the slowest

Codex's first response on a new project is the most expensive — it's scanning everything. Subsequent messages reuse the indexed state and are much faster.

Page 16
Codex Guide

The interface, decoded

Every element of the Codex app screen, named and explained.

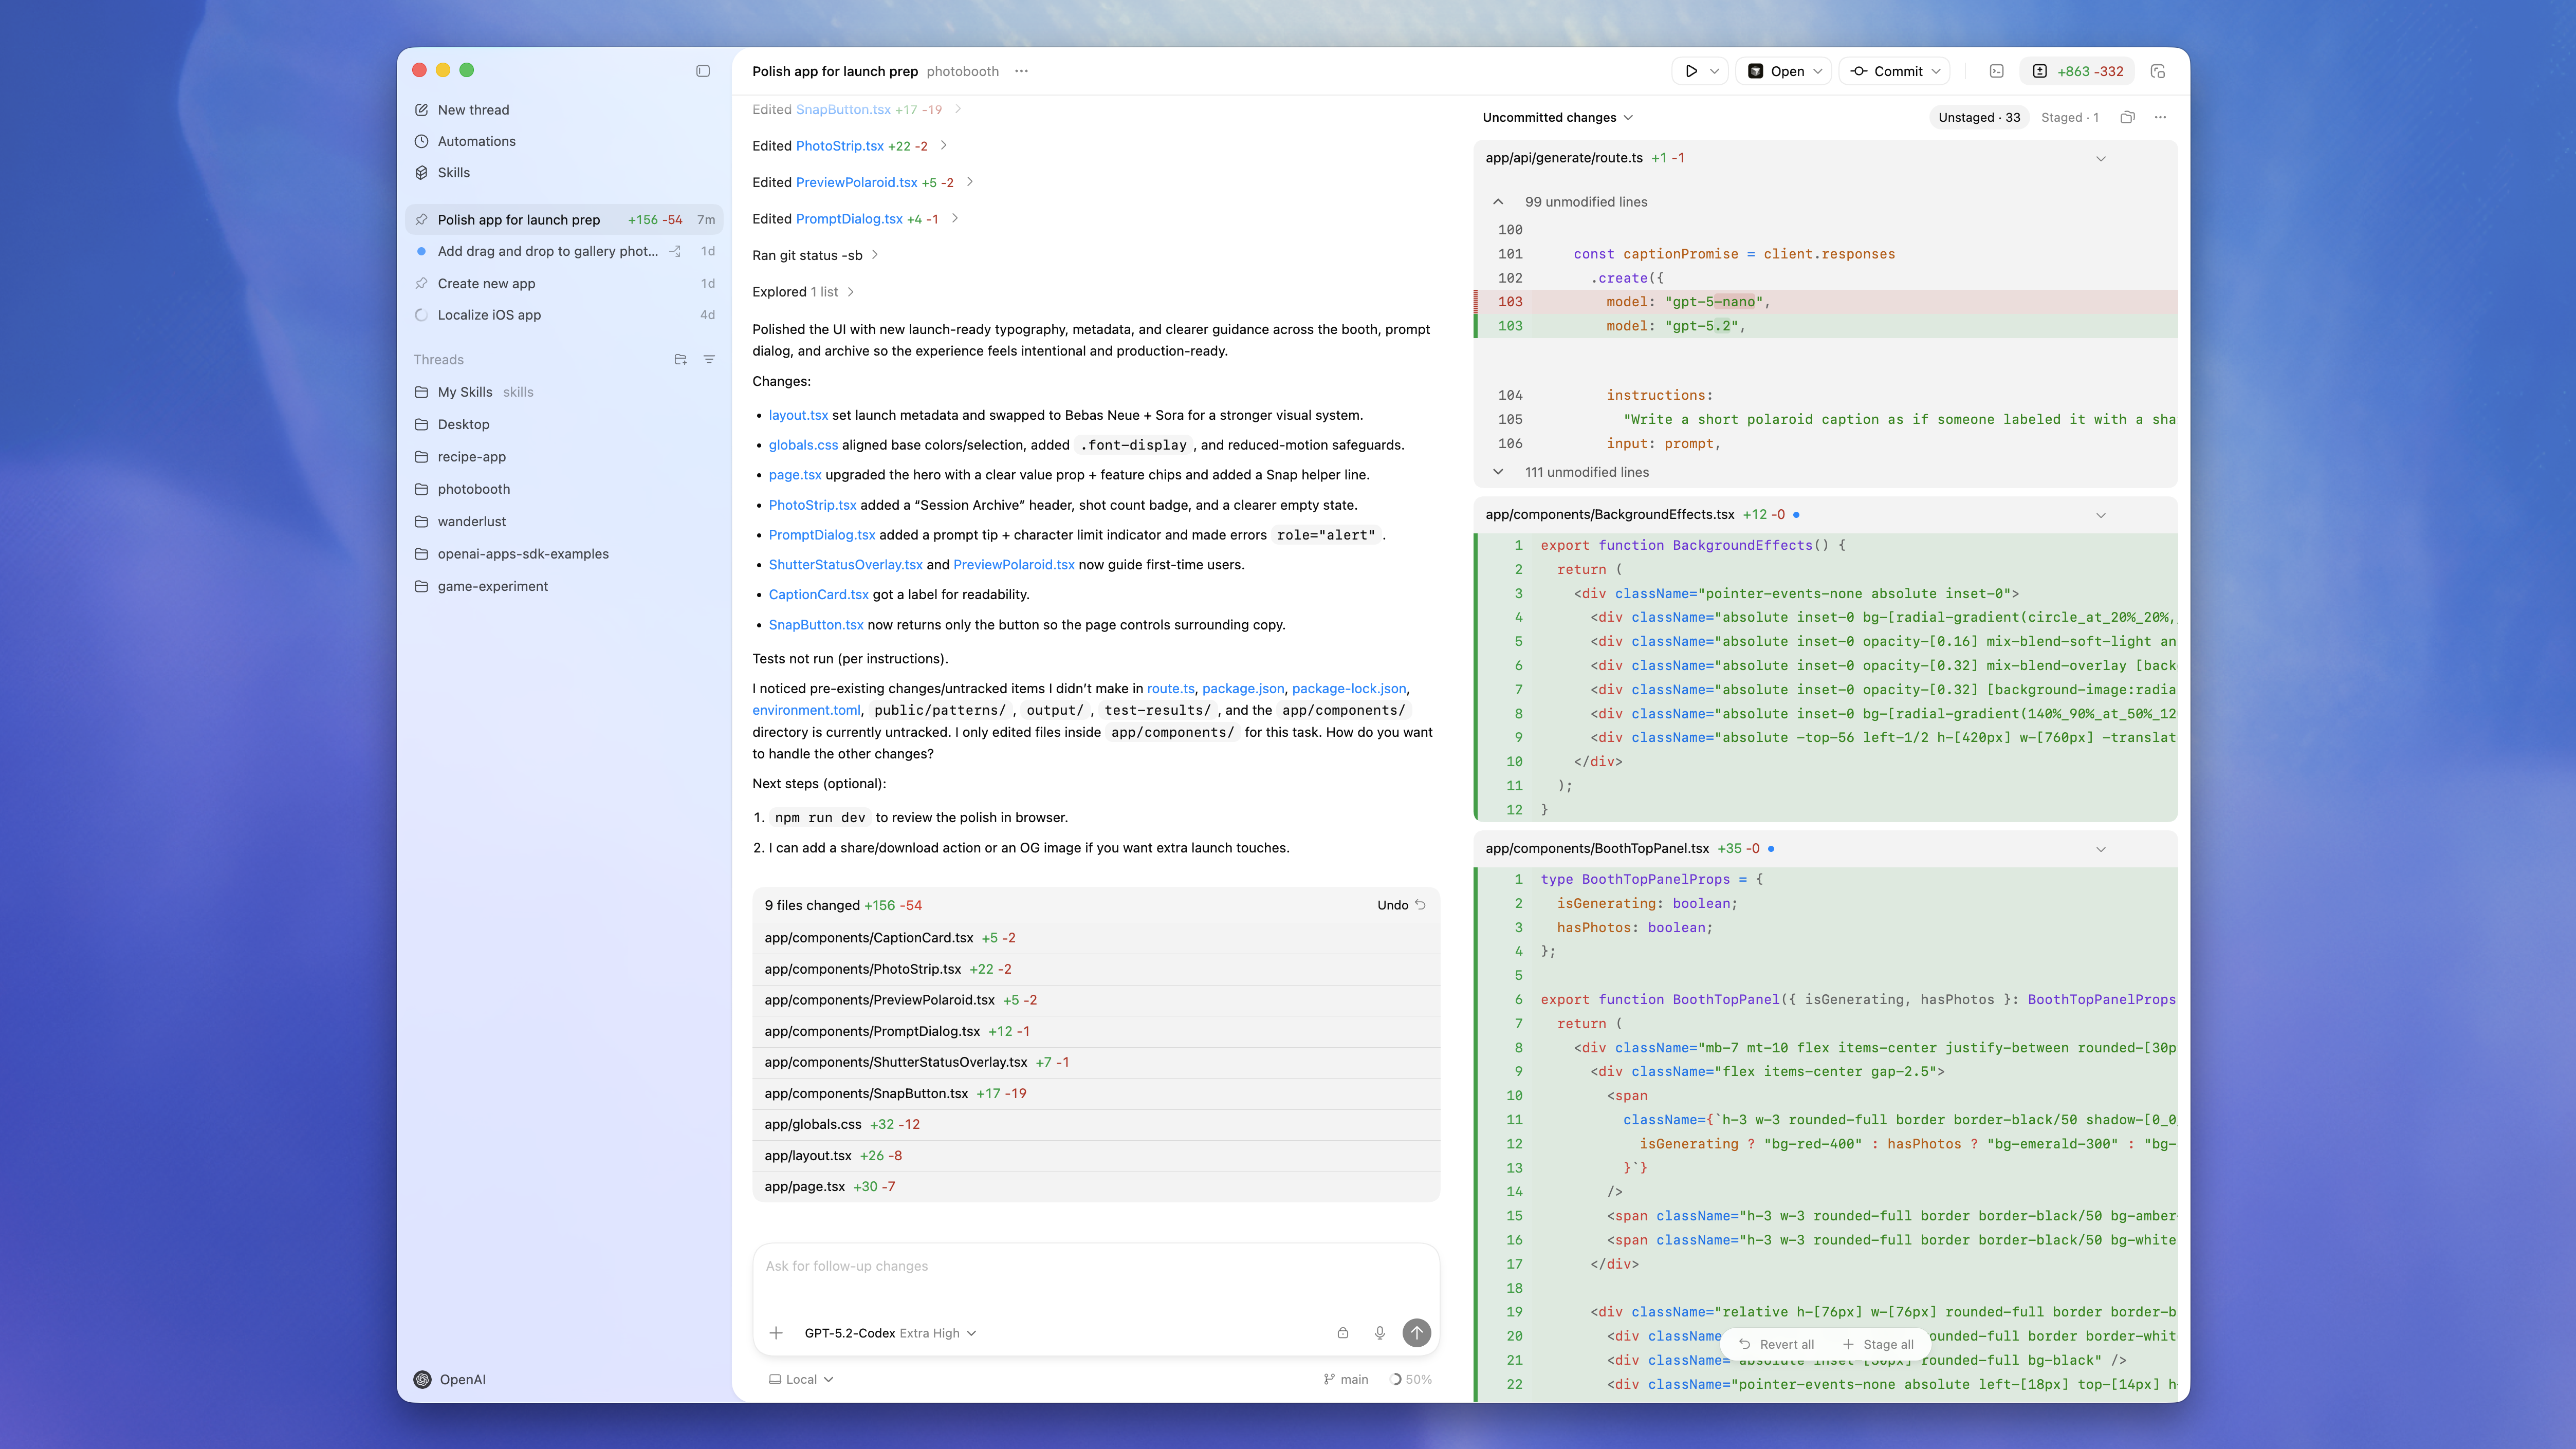
Codex Mac app interface
The Codex Mac app — official screenshot from developers.openai.com

Three regions

The Mac app divides the screen into three vertical regions:

The right pane is collapsible. When you're just chatting, you can hide it and let the center pane go full width. When Codex is actively making changes, the right pane is where you spend most of your attention.

Page 17
Codex Guide

Sidebar — projects & threads

Your map of everything Codex is currently working on.

Top section: projects

Every folder you've ever opened with Codex appears here. Click one to switch. Each project remembers its own thread history, AGENTS.md state, and settings.

Right-click a project for options:

Bottom section: threads

Threads inside the currently selected project. Each thread is one conversation on one task. Click a thread name to jump to it.

Thread icons

IconState
Active — Codex is working right now
Idle — open, waiting for your next message
Needs your attention — approval pending
Goal completed
🕐Scheduled (automation)

Searching threads

Press ⌘K to open the command palette. Type any keyword from a past thread to jump to it. Faster than scrolling for anything more than a week old.

Page 18
Codex Guide

Center pane — thread workspace

Where the conversation happens. Where you read Codex's thinking. Where you type next.

The message stream

Top to bottom in chronological order. Your messages on the right (or aligned differently depending on theme), Codex's responses on the left. Tool outputs (file reads, shell command output, diffs) appear inline as collapsible blocks.

Tool output blocks

When Codex runs a tool, you see a collapsed block: "Ran npm test", "Read src/auth.ts", "Edited 3 files." Click to expand and see the full output. Useful for auditing what actually happened.

The composer (input box)

At the bottom of the pane. A multi-line text area. Press Enter to send. Shift+Enter to add a newline. Type / to open the slash command menu. Type $ to open the skill picker.

Attaching files and images

Drag any file from Finder onto the composer. Drag an image to attach it for vision analysis. Drag a folder to scope Codex to just that subdirectory of the project.

Streaming responses

Codex's replies stream token-by-token. You can read along, interrupt mid-stream by pressing ⌘. (command-period), or queue a follow-up message while it's still typing.

Tip

Use ⌘. to interrupt when you see Codex heading in the wrong direction. Faster than waiting for it to finish, then correcting.

Page 19
Codex Guide

Right pane — review & terminal

The pane that lights up when Codex acts on your filesystem.

Review mode

When Codex proposes file changes, the right pane shows them as a Git-style diff — added lines highlighted blue, removed lines struck through. You can scroll through every changed file before any edit hits your real workspace.

For each file or hunk, you have three controls:

You can also accept all changes at once with ⌘⇧A, or reject all with ⌘⇧R.

Terminal mode

When Codex needs to run a shell command, the right pane switches to a terminal view. You see the command, its output streaming live, the exit code. You can type into the terminal yourself if you want to interact with the same shell session.

Browser mode

If Codex needs to navigate a webpage, the right pane becomes an in-app browser. You see the page as Codex sees it. Codex's clicks and form fills happen in real time — useful for verifying it's not accidentally filling the wrong field.

Switching modes manually

Tabs at the top of the right pane let you switch between Review / Terminal / Browser views regardless of what Codex is currently doing. Useful for inspecting state mid-task.

Page 20
Codex Guide

Status bar

A single line of always-visible state at the bottom of the window.

What it shows

FieldMeaning
Active modelGPT-5, GPT-5 mini, or whichever variant the current thread is using.
Sandbox moderead-only / workspace-write / danger-full-access. Colour-coded.
Approval policyuntrusted / on-request / never.
Context usagePercentage of the model's context window currently in use.
Token countTotal tokens consumed in this thread so far.
Network statusGreen dot = connected. Red = OpenAI unreachable.
Agent stateIdle / Planning / Editing / Running / Waiting for approval.

Clicking the status bar

Each field is clickable. Click the model name to switch models. Click the sandbox indicator to change modes. Click context usage to open a usage breakdown. Useful for quick adjustments without diving into Settings.

Hiding the status bar

If you prefer a cleaner window, toggle the status bar off in Settings → Appearance → Show status bar. The information remains available via the menu bar instead.

Visual cue

If you see the sandbox indicator glowing red (danger-full-access), Codex is operating with no filesystem or network restrictions. Make sure that's what you intended.

Page 21
Part 04 / 06
Daily use
Threads, slash commands, approvals, settings.
Codex Guide

Your first thread

A thread is one conversation with Codex on one task. Treat each thread as a focused work session.

Sending a task

Click into the input at the bottom of the thread. Type your task. Press Enter. Codex starts working immediately.

Watching it work

You'll see status updates as Codex moves: "Reading files…", "Planning…", "Editing src/foo.ts…", "Running tests…". The integrated terminal lights up when shell commands run. The review pane lights up when files change.

Approving changes

By default, Codex doesn't write to disk without you saying yes. When it proposes a file change, you see the diff in the review pane with three options:

When tasks span many turns

For multi-step tasks, Codex will keep working across multiple turns. You can intervene any time — interrupt with ⌘., send a steering message, or stop the thread entirely. The agent picks up your message when it finishes its current tool call.

Finishing a thread

When the task is done, just stop. You don't have to formally close anything — the thread stays in the sidebar, you can return to it any time. Use /status to see context usage; if it's getting high, start a new thread for the next task.

Page 23
Codex Guide

Worktrees — the safety net

Per-thread Git isolation. Mistakes are reversible, parallel threads don't collide.

What a worktree is

A worktree is a Git feature that lets you check out multiple branches of the same repo into different directories simultaneously. Codex uses this so each thread works on an isolated branch + working directory — changes don't touch your main checkout until you intentionally merge.

When worktrees are created

Automatically, when:

Where worktrees live

Codex stores worktrees under ~/.codex/worktrees/<project-hash>/<thread-id>/ by default. Configurable in Settings → Worktrees.

Merging changes back

When a thread finishes successfully, you have three options:

  1. Merge into main — Codex creates a regular Git merge or rebase into your default branch
  2. Open as a PR — Codex pushes the branch to your remote and opens a pull request
  3. Keep separate — leave the worktree alone, integrate manually later

Discarding a worktree

Made a mess? Right-click the thread → Discard worktree. The branch and its working directory are removed. Your main checkout is untouched.

Why this matters

Worktrees are why you can run three Codex threads in parallel without them stepping on each other. Each lives in its own little world until you choose to bring it back into main.

Page 24
Codex Guide

Slash commands

Type / in the composer to open the autocomplete menu.

CommandDescription
/planToggle plan mode. Codex builds a multi-step plan before acting. Use for complex tasks where you want to review the approach first.
/goalSet a persistent objective. Codex works toward it across multiple turns until done. Activates after using /plan.
/reviewEnter code review mode. Compare uncommitted changes against a base branch. Codex walks you through the diff and flags issues.
/mcpOpen MCP status. View connected MCP servers, their tools, and connection health.
/statusShow the current thread ID, context usage, model, and rate limit info.
/feedbackOpen the feedback dialog. Optionally include logs when submitting.

Skills via $

Skills (reusable instructions) are explicitly invoked using $ in the composer. Example: $review-pr invokes a saved "review pull request" skill. Different sigil than slash commands so skills don't collide with built-in commands.

Enabling hidden commands

Some commands are gated behind config flags. If /goal isn't showing, enable features.goals in ~/.codex/config.toml:

[features]
goals = true
Discoverability

Type / and pause — autocomplete shows every command available in your current context.

Page 25
Codex Guide

Sandbox modes

How much of your machine Codex can reach. Pick deliberately.

Read-only

Codex can inspect files and read project state. It cannot edit anything or run shell commands without explicit approval. Use this when you want Codex to analyse your codebase — code review, architecture exploration, audit — without any risk of changes.

Workspace-write (default)

Codex can read and edit files in the current workspace, and run routine local commands (tests, linters, builds). It asks for approval before accessing the internet or stepping outside the workspace.

This is the recommended mode for daily development. Maximum useful autonomy with minimum risk — Codex can work freely inside your project, but can't accidentally touch your home directory or hit external services.

Danger-full-access

All filesystem and network restrictions are removed. Codex can read and write anywhere on your machine, access the internet, run any command.

Reserve this for specific scenarios: setting up a new machine, running a complex migration that crosses many folders, or working in a throwaway VM where you genuinely don't need limits.

Treat danger mode like sudo

Don't leave Codex in danger-full-access as the default. Switch in for a specific task, switch out when done. Same discipline as running shell commands with sudo only when needed.

Page 26
Codex Guide

Approval modes

When Codex pauses and asks you. Independent from sandbox mode.

Untrusted

Codex asks before executing any command outside its pre-approved set. Maximum oversight. Slowest in terms of throughput — you're tapping Approve a lot — but you see and consent to every action.

Use this for unfamiliar tasks, sensitive codebases, or when you're first learning how Codex behaves.

On-Request (default)

Codex works freely inside the sandbox boundaries you've set. It only asks when it needs to step outside — internet access during workspace-write, command outside the workspace, etc.

Best balance of autonomy and safety. The default for a reason.

Never

Codex never asks. It just acts within whatever sandbox is set.

This is dangerous if combined with danger-full-access. Only safe when combined with read-only or workspace-write. The combination of never + read-only is fine — Codex genuinely can't do harm.

Recommended combinations

SituationSandboxApproval
Daily developmentworkspace-writeon-request
Code review onlyread-onlynever
Unattended automationworkspace-writenever
Learning / testing Codexworkspace-writeuntrusted
Throwaway VM taskdanger-full-accesson-request

Switching modes

Dropdown in the toolbar or status bar. Or set persistent defaults in ~/.codex/config.toml with sandbox_mode and approval_policy.

Page 27
Codex Guide

Settings — Account, Model, Permissions

The first three sections of Codex → Settings. Where you configure who you are, what you're using, and what's allowed.

Account

Shows the email or organisation you're signed in as. Sign out / sign back in lives here. Switch between ChatGPT and API-key auth without losing your projects.

Also displays current plan tier — Plus, Pro, Business, Enterprise. The plan affects which models you can pick.

Model

Pick the default model for new threads. Options depend on your plan tier:

You can override the model per-thread from the thread header dropdown — the global setting is just the default.

Permissions

Where you set the default sandbox mode and approval policy. See the previous two pages for what each setting does. Most users leave this at workspace-write + on-request.

Per-project overrides

If you want different defaults for different projects, edit the project's .codex/config.toml at the project root. Project config overrides global.

Page 28
Codex Guide

Settings — Workspace, Worktrees, Integrations

The middle settings sections. Where projects, Git, and external services connect.

Workspace

Default project folder, recent projects list, and ignore patterns. The ignore patterns matter: files matching them are invisible to Codex. Use it to hide:

Worktrees

Toggle whether new threads auto-create worktrees (default: yes). Set where worktrees live on disk. Set what happens on thread completion — auto-merge, auto-PR, or leave alone.

For most users the defaults are correct. Power users sometimes change the worktree directory to a faster drive or a different filesystem.

Integrations

One-click connectors for external services:

Each integration has its own auth flow (mostly OAuth). Disconnect from this same panel when you no longer need them.

Page 29
Codex Guide

Settings — MCP, Skills, Automations

The extensibility sections. Where Codex grows beyond defaults.

MCP

Manage Model Context Protocol servers — small programs that expose additional tools to Codex. Add a server with a name and connection details. Inspect which tools each server exposes. Allow-list tools you want, hide the rest.

Common MCP servers people add: Postgres, GitHub (deeper than the integration), Stripe, Notion, Linear, Brave Search, Puppeteer.

Skills

Reusable instruction sets. Create a skill once, invoke with $skill-name from any thread.

Skills are plain markdown files under ~/.codex/skills/. The Settings panel is a GUI for editing them. You can also edit the markdown directly — the app reloads on change.

Automations

Scheduled or recurring tasks Codex runs in the background. Three trigger types:

Each automation has a destination — where its output goes (a thread, a Slack channel, an email, a Linear issue).

Start small

Your first automation should be something you do every Monday — a weekly review, a dependency audit, a test-summary digest. Start with one. Add more as you see what's reliable.

Page 30
Codex Guide

Settings — Appearance, Notifications, Advanced

The polish-and-power sections. Where you make Codex feel like yours.

Appearance

Notifications

Codex can send native macOS notifications for:

Each can be toggled independently. Useful for long-running threads — you can switch to another app, get a ping when Codex needs you.

Updates

Auto-update toggle (recommended: on). Release channel: stable (default) or beta. View the update history with release notes for each version.

Advanced

Telemetry on/off. Debug flags. Log paths. Direct link to open ~/.codex/config.toml in your default editor. Reset all settings to defaults (with confirmation).

Most users never visit Advanced. If you're debugging an issue or running Codex in an unusual environment, this is where you find the knobs.

Page 31
Part 05 / 06
Power features
Computer Use, browsers, image gen, MCP, automations, multitasking.
Codex Guide

Computer Use

Codex driving your cursor, keyboard, and screen on macOS. Real GUI automation.

What it does

Computer Use lets Codex take screenshots, move the cursor, click, type, and switch apps. Tasks you used to do manually — filling forms in native apps, dragging files in Finder, configuring system preferences — Codex can drive end-to-end.

When to use it

When NOT to use it

Computer Use is slower and more failure-prone than dedicated tools. Always prefer the specialised toolset when available:

The rule

Computer Use is the tool of last resort. If anything more specialised exists, use that. Only reach for Computer Use when you've ruled out everything else.

Page 33
Codex Guide

Computer Use — permissions setup

macOS requires two privacy grants before Codex can drive your machine. Both are one-time.

Permission 1 — Accessibility

Needed for cursor and keyboard control. Without it, Codex can read what's on screen but can't act.

  1. Open System Settings → Privacy & Security → Accessibility
  2. Click the + button
  3. Navigate to Applications → Codex
  4. Add it, ensure the toggle is on

Permission 2 — Screen Recording

Needed for screenshots. Codex uses screenshots to see what's on screen before deciding where to click.

  1. Open System Settings → Privacy & Security → Screen Recording
  2. Click the + button
  3. Navigate to Applications → Codex
  4. Add it, ensure the toggle is on

Restart required

After granting Screen Recording, macOS requires the Codex app to restart for the permission to take effect. Quit Codex (⌘Q) and re-open.

Verifying it works

In a thread, ask Codex: "Take a screenshot of my screen and describe what's open." If you see a screenshot in the thread and Codex describes the windows, both permissions are working.

Revoking later

To disable Computer Use, untick the Codex toggle in either permission panel. The capability disappears immediately — no restart needed to disable.

Privacy note

Screenshots are sent to OpenAI's servers for vision analysis. Codex can see whatever is on your screen when you've granted Screen Recording. Disable when you don't need it for sensitive work.

Page 34
Codex Guide

Appshots

The lightweight version of Computer Use. Snap a window, send it to Codex, ask a question.

What it is

An Appshot is a one-shot screenshot of the frontmost macOS window, automatically attached to the current Codex thread. No full Computer Use loop — just an image into the chat.

When to use it

How to take one

The default keyboard shortcut is ⌘⇧A (configurable in Settings → Shortcuts). Press it while any window is active. Codex captures that window and attaches it to your most recent thread.

Alternative: use the menu bar Codex icon → Take Appshot.

After the Appshot is attached

Codex doesn't auto-analyse — you tell it what to do with the image. Type a follow-up question:

What does this error message mean?
How would you fix this layout?
Convert this diagram into a TypeScript interface.
Privacy

Appshots send the captured image to OpenAI. Same privacy considerations as Screen Recording. Don't Appshot windows that contain secrets, customer data, or anything you wouldn't paste into ChatGPT.

Page 35
Codex Guide

The in-app browser

A built-in Chromium pane inside the Codex app. Codex can navigate, click, fill, read.

How to open it

Three ways:

DOM-aware (not visual)

The in-app browser exposes the page's DOM directly to Codex. That means Codex finds elements by their actual structure, not by trying to recognise pixels. Result: faster, more reliable than Computer Use for any web task.

What it's good for

What it's NOT good for

Pages that require your authenticated session — Gmail, Notion, GitHub, etc. The in-app browser doesn't share cookies with your real Chrome. For those, you want the Chrome extension instead.

Closing pages

Each tab in the in-app browser persists across messages in a thread. To clean up, click the X on individual tabs or right-click and choose "Close all tabs."

Page 36
Codex Guide

The Chrome extension

Connect Codex to your real Chrome — the one with all your logged-in sessions.

Why a separate extension

The in-app browser is sandboxed. It doesn't share cookies with your Chrome. So Codex can't act on services where you're logged in unless you give it access to your Chrome itself. The Chrome extension does exactly that.

Installing

  1. Open Codex Settings → Integrations → Chrome Extension
  2. Click Install — Chrome opens the Web Store page
  3. Click Add to Chrome, confirm the permissions prompt
  4. Pin the extension icon to your Chrome toolbar (puzzle icon → pin)
  5. Click the icon, sign in with the same OpenAI account you use for the Codex app
  6. Back in Codex Settings → Integrations, the Chrome extension now shows "Connected"

What it unlocks

Codex can now act on any tab in your Chrome with your logged-in identity. Examples:

Security implications

The extension can see and act on every page you visit while it's enabled. That's the whole point — but it's a real permission. Best practices:

In-app vs Chrome ext — quick rule

Public sites = in-app browser. Logged-in sites = Chrome extension.

Page 37
Codex Guide

Image generation

Codex can generate and edit images directly inside a thread.

How to trigger it

Just ask. Examples:

Generate a hero banner image for this landing page,
1600x800, abstract, blue palette.

Create a 1024x1024 app icon for a coding tool —
gradient background, terminal prompt glyph in the center.

Edit the attached screenshot — remove the watermark.

Codex calls OpenAI's image model (GPT-Image-1 or successor) and returns the result inline in the thread. You can right-click any generated image to save it, copy it, or use it as a reference for a follow-up generation.

When this is useful for developers

Editing images

Attach an image to a thread (drag from Finder, or paste). Tell Codex what to change:

Remove the background from this image.
Make this colour palette warmer.
Add a small badge in the top-right that says "BETA".

What costs what

On ChatGPT auth, image generation uses your existing plan's quota. On API key auth, it costs per generation (cheap, but not free). The Settings → Account section shows your current usage if applicable.

Cloud thread requirement

Image generation runs in cloud threads. If you signed in with an API key, image gen may be unavailable depending on your tier — check Settings → Model for confirmation.

Page 38
Codex Guide

MCP — extending Codex

An open standard for plugging external tools into AI agents.

What MCP is, plainly

An MCP server is a small program that exposes tools to any MCP-aware agent. Codex speaks MCP, so any MCP server you connect becomes part of Codex's toolkit.

Hundreds of MCP servers already exist. Some popular ones:

ServerGives Codex access to
GitHub MCPFull GitHub API — issues, PRs, repos, search, releases
Postgres MCPQuery and modify your Postgres database
Notion MCPRead and write Notion pages
Slack MCPRead channels, post messages
Stripe MCPQuery customers, charges, subscriptions
Linear MCPRead and create Linear issues
Brave Search MCPSearch the web with structured results
Puppeteer MCPProgrammatic browser automation

Two transport types

Codex supports both. You pick based on the server's docs — most stdio MCPs are installed via npm or pip.

Verifying servers are connected

In any thread, type /mcp. You see all connected servers and the tools each one exposes. Disconnect or troubleshoot from the same panel.

Page 39
Codex Guide

Adding an MCP server

A concrete walkthrough using the GitHub MCP server as an example.

Step 1 — Get the GitHub MCP server

GitHub MCP ships as an npm package. Codex can install it automatically, or you can pre-install:

npm install -g @modelcontextprotocol/server-github

Step 2 — Get a GitHub token

Go to github.com/settings/tokens. Create a fine-grained personal access token with scopes for the repos and operations you want Codex to perform. Save the token.

Step 3 — Add the server in Codex

  1. Open Settings → MCP → Add Server
  2. Name: github
  3. Command: npx
  4. Args: @modelcontextprotocol/server-github
  5. Environment variables: GITHUB_PERSONAL_ACCESS_TOKEN=<your-token>
  6. Click Save

Codex starts the server, queries it for the list of exposed tools, and shows them in the panel. You can disable individual tools if a server exposes too many.

Step 4 — Use it

In any thread:

List my open pull requests across all repos.
Find the most-commented issue in our main repo.
Create a new issue in repo X with title Y and body Z.

Codex routes these to the GitHub MCP server automatically.

Removing or editing servers

Same panel — click the server name. Edit lets you change env vars or args without re-adding. Remove disconnects and unloads the server.

Reload

After editing MCP config, type /mcp in a thread — Codex offers to reload servers without restarting the app.

Page 40
Codex Guide

Skills — reusable instructions

Save instruction sets, invoke them with $name. Skills compound your productivity.

Skills vs MCP

MCP exposes external tools. Skills are pure prompt logic — saved instructions Codex can apply on demand. No external server, just a markdown file with directions.

When to make a skill

Any time you find yourself typing the same instruction twice. Common patterns:

Anatomy of a skill file

---
name: review-pr
description: Review the current PR or uncommitted changes
  with focus on security, perf, and edge cases.
tags: [review, quality]
---

## When triggered

Use when the user asks for a code review on a PR or
on uncommitted changes in the current branch.

## Steps

1. Run git diff main to see all changes
2. For each file, list potential issues:
   - Security: input validation, auth, secrets
   - Performance: hot loops, N+1 queries, missing caching
   - Edge cases: nullish handling, error paths, race conditions
3. Group by severity (blocker / major / minor)
4. Return a markdown report
Page 41
Codex Guide

Creating & using your own skill

From idea to installed skill in under ten minutes.

Step 1 — Decide what the skill does

Pick something specific you do often. Bad: "be helpful with code." Good: "review a Pull Request focusing on security, performance, edge cases — return a markdown report ranked by severity."

Step 2 — Create the skill

  1. Open Settings → Skills → New Skill
  2. Give it a name (lowercase, hyphens, no spaces) — e.g. review-pr
  3. Write a one-sentence description — this is what shows in autocomplete
  4. Write the instruction body — what Codex does when invoked
  5. Choose scope — Global (every project) or Project (just this one)
  6. Click Save

Step 3 — Invoke it

In any thread, type $review-pr. Codex loads the skill's instructions and runs them on the current context.

You can also chain a follow-up: $review-pr focus on the auth changes specifically. The skill loads, the extra instruction modifies its behaviour.

Editing a skill

Skills live as markdown files in ~/.codex/skills/. Edit through the Settings GUI or directly in your editor — Codex reloads on file change. No restart needed.

Cross-surface skills

A skill created in the Mac app is automatically available in the CLI and IDE extension. Same files, same engine, same invocations.

Skill library mindset

Treat your skills folder like your dotfiles. Curate it. Share with your team via a shared Git repo synced into ~/.codex/skills/. Skills are how Codex stops being generic and starts feeling like yours.

Page 42
Codex Guide

Multitasking — parallel threads

The killer feature on the Mac app. Three threads = three tasks in parallel.

The setup

Open a Git-tracked project. Verify worktrees are enabled in Settings (they are by default). Now click New Thread three times. You have three empty conversations, each with its own worktree.

A real workflow

  1. Thread 1: "Refactor the auth module to use JWTs instead of sessions."
  2. Thread 2: "Write integration tests for the payment flow."
  3. Thread 3: "Update the README to match the new API."

Each runs independently. Switch between them by clicking in the sidebar. Each one's changes live in its own worktree — they don't interfere.

Throughput math

Without parallelism, three tasks taking 20 minutes each = 60 minutes of work. With parallelism, you still pay ~60 minutes of model time, but you can review them simultaneously — actual elapsed wall time drops to ~25-30 minutes depending on how fast you accept changes.

Where the bottleneck moves

You. Once Codex is running three threads in parallel, the limit becomes how fast you can review diffs and approve actions. Not how fast the model thinks.

Merging at the end

When each thread finishes, you merge its worktree into main one at a time. Conflicts (rare, because the threads usually touch different files) are resolved manually in your Git client.

Mind your context

Each parallel thread uses its own model context. Three big threads = 3× your token spend. Watch /usage if you're on metered billing.

Page 43
Codex Guide

Automations & scheduled tasks

Recurring work Codex does without you. Set once, forget.

Three trigger types

Real examples

Creating one

  1. Settings → Automations → New Automation
  2. Pick trigger type (time / event / manual)
  3. Configure trigger (cron string for time, event source for event)
  4. Write the task — exactly what you'd type into a thread
  5. Pick destination — where output goes (back to a thread, Slack, email, GitHub PR comment)
  6. Save

Monitoring

The Automations panel shows last-run time, last-run status, and the full history. Click any past run to see the thread it produced.

Start small

Your first automation should be one thing you do every Monday. Add more later as you see which ones are reliable. Don't try to automate everything on day one.

Page 44
Part 06 / 06
Reference & mastery
AGENTS.md deep dive, memories, troubleshooting, cheat sheet.
Codex Guide

AGENTS.md — the project brief

A markdown file that tells Codex how to work in your project. Loaded every time, applied automatically.

Why it matters

Without AGENTS.md, Codex starts every thread with no context about your project's conventions. It guesses based on what it sees in the codebase. Often wrong, occasionally embarrassing.

With AGENTS.md, Codex starts every thread already knowing your stack, your commands, your rules, your style. The cost of writing one good AGENTS.md pays itself back within a day.

When Codex loads it

At the start of every thread, before any user message. The combined content of all matching AGENTS.md files appears in the system prompt — Codex sees it as the project's rulebook for everything it's about to do.

What to put in it

  1. Stack — languages, frameworks, key dependencies
  2. Commands — how to run tests, lint, build, dev server
  3. Conventions — code style, naming, file layout
  4. Constraints — what to never do (secrets, prod, certain libraries)
  5. Domain context — anything Codex couldn't infer from the code

What NOT to put in it

Page 46
Codex Guide

AGENTS.md — placement & precedence

Codex looks in three places. Files concatenate from broadest to most specific.

The hierarchy

ScopePathWhen
Global~/.codex/AGENTS.mdApplies to every project unless overridden.
Project root./AGENTS.md at Git rootApplies to this whole repo.
Subdirectorysubdir/AGENTS.mdApplies only when working inside that subdirectory.
OverrideAGENTS.override.md anywhereReplaces the AGENTS.md at the same level entirely.

Concatenation order

Codex walks from broadest scope to most specific. Global first, then project root, then each nested directory between root and your current working directory. Files concatenate in order. Later files (more specific) override earlier ones because they appear last in the combined prompt.

Size limit

Codex stops loading once the combined size hits project_doc_max_bytes (default 32 KiB). If your instructions are bigger, either split across nested directories or raise the limit in ~/.codex/config.toml:

[project_docs]
project_doc_max_bytes = 65536

Verifying which files loaded

Run this in any thread:

Summarize the current instructions you're operating under.

Codex echoes back the gist of every AGENTS.md it loaded. Useful when you're not sure which files are taking effect.

Logs

For exact info on which files Codex loaded, check ~/.codex/log/codex-tui.log — there's a line per file loaded at session start.

Page 47
Codex Guide

AGENTS.md — a worked example

A concrete AGENTS.md for a fictional FastAPI backend. Copy, adapt.

# Project: Acme Backend

A FastAPI service handling auth, payments, and webhooks for
the Acme product suite.

## Stack
- Python 3.12, FastAPI, SQLAlchemy 2 (async)
- Postgres 16 (prod), SQLite (tests)
- Stripe SDK for payments
- pytest for tests, ruff for lint, mypy strict for types

## Commands
- Run tests: make test
- Run lint: make lint
- Run typecheck: make typecheck
- Start dev server: make dev
- Apply migrations: make migrate

## Conventions
- Async everywhere — no sync functions in route handlers
- Prefer pure functions; raise early instead of nesting if/else
- All public API responses go through Pydantic response models
- Database access only through repository classes in /repos
- No business logic in routes; routes call services

## Style
- Type-annotate every public function and class
- Use Pydantic v2 syntax (model_dump, not dict())
- Keep modules under 400 lines; split when growing

## Never
- Never run migrations against prod from this machine
- Never commit secrets — check .env.example first
- Never disable lint or typecheck warnings inline
- Never bypass the repository layer for direct DB access

## Domain context
- Customers are B2B; assume technical sophistication
- We serve EU and US — be mindful of timezones in UI copy
- Stripe webhooks must verify signatures; never trust the body alone
Page 48
Codex Guide

Memories

Persistent facts Codex remembers across threads, sessions, days.

What memories store

Small facts about you and your workflow. Examples:

How memories get created

Two ways:

  1. Automatically — Codex notices a recurring pattern (you correct it on the same thing twice) and saves a memory
  2. Explicitly — you tell it: "Remember that we use Bun in this project." Codex confirms and saves.

Inspecting memories

Open Settings → Memories. You see the full list of facts Codex is operating with. Each has a timestamp, a source (auto vs explicit), and a delete button.

Editing or deleting

Click a memory to edit its text directly. Click delete to remove. Codex won't recreate a deleted memory unless you re-introduce the same pattern that originally triggered it.

Project-scoped memories

Some memories apply globally (your name, your style). Others apply only to a specific project (this codebase uses Bun, that codebase uses Node). Codex tags memories automatically — global vs project — based on context when they're created.

Audit monthly

Outdated assumptions cause stale advice. Open Settings → Memories every month or so. Delete anything that's no longer true.

Page 49
Codex Guide

Chronicle & privacy

Long-form session history, and where Codex's data actually lives.

Chronicle — extended history

Different from memories. Memories are facts. Chronicle is the timeline — what threads ran, what tasks completed, what diffs got merged. Codex reads it to maintain context across days.

You don't manage Chronicle directly. Codex consults it automatically when starting a new thread to refresh on what's been happening recently. Without Chronicle, every thread would start cold; with it, threads start warm.

Where Codex stores data

All under ~/.codex/:

PathContents
~/.codex/config.tomlYour settings
~/.codex/AGENTS.mdGlobal agent brief
~/.codex/skills/Your skills (markdown files)
~/.codex/memories.dbSQLite database of memories
~/.codex/chronicle.dbSQLite database of session timeline
~/.codex/worktrees/Per-thread Git worktrees
~/.codex/log/All app + session logs

What leaves your machine

Only what Codex actively sends to OpenAI's servers as part of model inference — your messages, the files Codex reads, tool outputs, image attachments. Memories, skills, and config stay local. Logs are local.

Wiping everything

Sign out of Codex. Quit the app. Delete ~/.codex/. Trash /Applications/Codex.app. You're now completely uninstalled.

Selective wipe

Want to keep your settings but wipe memories? Delete just ~/.codex/memories.db while the app is closed. Codex creates a fresh empty one on next launch.

Page 50
Codex Guide

Troubleshooting

The fixes for the issues you'll actually hit.

SymptomFix
App won't launch on first installRight-click in Applications → Open. Gatekeeper allows the unidentified-developer warning to be bypassed once.
Browser auth doesn't redirect backCopy the codex:// URL from the auth page, paste into Spotlight, press Enter. macOS routes it to the app.
"Permission denied" when editing filesSandbox mode is too restrictive. Switch to workspace-write in Settings → Permissions.
Codex won't run shell commandsApproval policy is set to Untrusted, blocking by default. Switch to On-Request.
Computer Use commands fail silentlyAccessibility or Screen Recording permission not granted. System Settings → Privacy & Security.
MCP server shows "Disconnected"Check the server's env vars (API key, base URL) in Settings → MCP. Re-save to retry.
AGENTS.md not being loadedCheck file is at Git root, named exactly AGENTS.md. Re-open the project. Run a test summary command.
Worktree conflicts on mergeResolve manually in your Git client. Codex's worktree is just a checkout — your normal Git workflow applies.
Token limit hit mid-taskSwitch to a model with more context (GPT-5 extended). Or split the task into smaller threads.
App feels slow / laggySettings → Advanced → Logs. Often a backgrounded thread waiting on a stuck shell command. /stop in the thread.

Where logs live

~/.codex/log/codex-tui.log         # app session logs
~/.codex/log/mcp-*.log              # per-MCP-server logs
~/.codex/log/auth.log               # sign-in flow trace

Getting help

Inside any thread, type /feedback to open the feedback dialog. Optionally attach logs. OpenAI's Codex team reads these. Or join the official Discord — link in Help → Community.

Page 51
Codex Guide

Mastery patterns

The handful of workflows that separate occasional users from operators.

Pattern 1 — Write AGENTS.md first

Before your first real task in a new project, spend 10 minutes writing a tight AGENTS.md. List the stack, the commands, the conventions, the never-dos. Every subsequent thread benefits.

Pattern 2 — One thread per task

Don't pile multiple unrelated tasks into one thread. Open a new thread per task. Each gets its own worktree, its own context, its own clean diff.

Pattern 3 — Plan mode for anything non-trivial

For tasks beyond "fix this one bug," start with /plan. Codex builds a step-by-step approach. You review the plan before any code is touched. Saves backtracking later.

Pattern 4 — Skills for repeat work

If you find yourself typing the same instruction twice — "review this PR, focus on security and performance" — turn it into a skill. $review from then on.

Pattern 5 — Parallel threads for big features

Big feature? Split it into 3-5 independent tasks. Open a thread per task. Run in parallel. Merge worktrees at the end. Three days of work compresses to one.

Pattern 6 — Use the cloud for review

For pull-request reviews, tag @codex in a GitHub PR comment. Codex reviews in the cloud, posts findings as comments. No local thread needed.

Pattern 7 — Automate the boring

Anything you do every Monday morning, every release, every PR — turn it into an automation. Codex runs it in the background. You get a notification when it's done.

The compounding effect

None of these is dramatic by itself. Together they make Codex feel like a team. AGENTS.md sets the rules. Skills capture the recurring moves. Parallelism scales throughput. Automations remove chores.

Page 52
Codex Guide

Cheat sheet

The printable reference. Keep it next to your keyboard.

Setup

# Install
Download .dmg from developers.openai.com/codex/app
Drag into Applications, right-click → Open on first launch

# Sign in
Continue with ChatGPT  (recommended)
Or paste an API key

# First project
Open Folder → pick a directory
Codex auto-detects AGENTS.md and indexes the project

Top slash commands

/plan         # multi-step planning mode
/goal         # persistent goal across turns
/review       # code review mode
/mcp          # view connected MCP servers
/status       # thread ID, context usage, limits
/feedback     # submit feedback + logs
$skill-name   # invoke a saved skill

Keyboard shortcuts

ShortcutAction
⌘KCommand palette / quick search
⌘NNew thread
⌘.Interrupt the running agent
⌘BToggle the right pane (browser)
⌘⇧ATake an Appshot
⌘⇧A (in review)Accept all proposed changes
⌘⇧RReject all proposed changes
⌘,Open Settings
⌘QQuit Codex

Where things live

~/.codex/data root
~/.codex/config.tomlmain config
~/.codex/AGENTS.mdglobal agent brief
~/.codex/skills/your skills
~/.codex/log/session + MCP + auth logs
./AGENTS.mdproject-scoped brief (per repo)
Page 53
Codex Guide
End · v01
You are now ready
Open Codex.
Pick a folder.
Ship something.
Everything in this guide is at your fingertips now. Start with a small task. Then another. Then the next.
Source OpenAI · developers.openai.com/codex
Images developers.openai.com assets
Compiled 2026